Difference between revisions of "HowTo Use OpenFOAM with QtCreator"
m (Added to the category Develop) |
Pete Bachant (Talk | contribs) m (→Why to use Qt Creator?) |
||
| Line 1: | Line 1: | ||
[http://qt.nokia.com/products/developer-tools| Qt Creator] is a powerful and flexible cross-platform integrated development environment (IDE) with strong orientation and support for C/C++ native development. | [http://qt.nokia.com/products/developer-tools| Qt Creator] is a powerful and flexible cross-platform integrated development environment (IDE) with strong orientation and support for C/C++ native development. | ||
| − | = Why | + | = Why use Qt Creator? = |
| + | Qt Creator is: | ||
* Open Source | * Open Source | ||
* Cross Platform – Works perfectly on Linux, Windows and Mac OS X | * Cross Platform – Works perfectly on Linux, Windows and Mac OS X | ||
Revision as of 02:20, 13 November 2014
Qt Creator is a powerful and flexible cross-platform integrated development environment (IDE) with strong orientation and support for C/C++ native development.
Contents
1 Why use Qt Creator?
Qt Creator is:
- Open Source
- Cross Platform – Works perfectly on Linux, Windows and Mac OS X
- Direct compatibility with other applications of Qt SDK (great for building GUI-applications!)
- Actively developed and improved
- Excellent syntax highlighting
- Magnificent code browsing and navigation in combination with useful and customizable keyboard shortcuts
- Great and generic (works with any file you include, it doesn’t have to know anything special about it)
- Code completion support
- Easily customizable and Extensible through plugins
- Support for integration with various Source Control Management tools like Git, Subversion, Bazaar, Mercurial, CVS and more.
- Debugger integration with both GDB and Microsoft’s Debugging Tools for Windows through CDB
- Custom configure, build, clean and deployment steps
- Integration with tools like Valgrind
- Per project settings
- Vim editing mode
- Code snippets
- A pretty fast IDE, even when indexing hundreds of files with hundreds of thousands lines of code for the first time
- Linux Man Pages context help integration - thanks to the flexible Qt Help System, this can be extended to almost any API
2 Download and installation
Most of the main Linux distributions have binaries in their repositories. Otherwise, download and install Qt Creator from http://qt.nokia.com/downloads.
Installation example in Debian/Ubuntu:
# apt-get install qtcreator
3 OpenFOAM project in Qt Creator
Obs.: Using Qt Creator version 2.5.0
3.1 Starting a project
- Open Qt Creator.
- Go to File
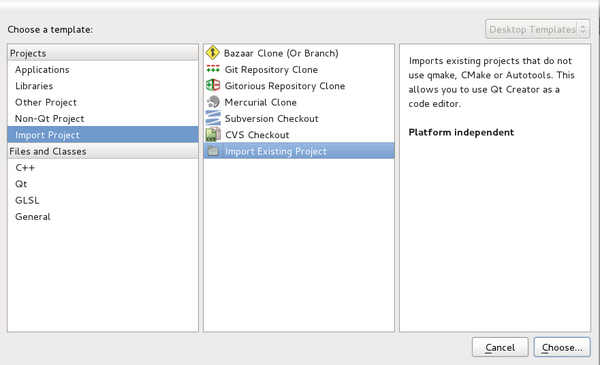
 New File or Project Other Project.
- Click on Import Existing Project.
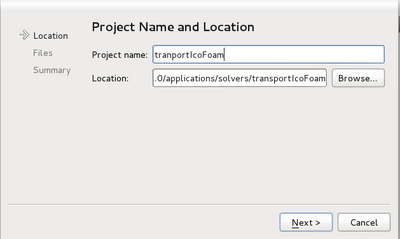
- Give your project a name and select the location to your project source tree. Select the directory where the source-files (*.C, *.H) of your OpenFOAM application are. A project-file <project name>.creator will be created inside the selected directory.
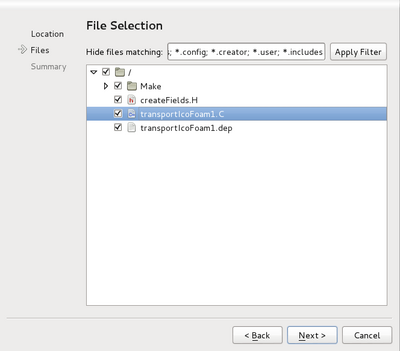
- A screen will pop up asking you to select the files to be added to the project.
- The next screen, Project Management, is going to ask you if you want to use source control management (git, svn) for your project and if yes,then the project files will be the first to be added to the project. You should add these files to the scm repository only if you know that they would be usefull for others, otherwise you should keep them to your self, by using exclude directives like .gitignore files in git or svn:ignoreproperty in svn.
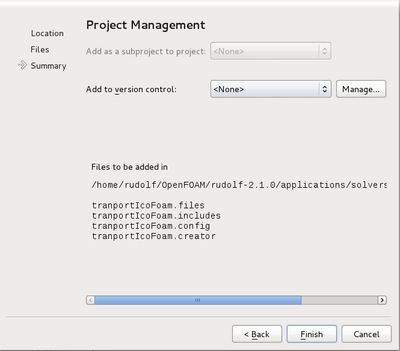


If everything went well, your project is ready.
3.2 Configuring for wmake
You should now have your project open in Qt Creator and ready to proceed to project settings. On the left side of Qt Creator click on Projects. Right now you’re looking at the Build Settings screen. This is where you set your project building and cleaning steps.

- Build directory is your reference directory stored in %{buildDir} variable.
You have probably configured your OpenFOAM to work in the shell terminal by adding the command
source /usr/local/OpenFOAM/OpenFOAM-2.1.0/etc/bashrc
to your ~/.bashrc script-file. This exports environment variables pointing to libraries and executables directories of a selected OpenFOAM version. However, ~/.bashrc-script will not be able run if you launch Qt Creator from the window manager and you will not be able to simply call wmake to compile your application. Yet, there are several ways to use wmake.
3.2.1 Option 1: using foamExec
The cleanest in my opinion. Run the command foamExec with command argument wmake or wclean, as shown in the Figure above. This foamExec-script will load any OpenFOAM application of its same version (in this case 2.1.0).
3.2.2 Option 2: write your own script
Other less advisable option is to write your own shell script like the makeScript also shown in the same Figure. Notice that this option was disabled there, so only the first is run by the Build Project command.
#!/bin/bash
#Adding OpenFoam to shell environment
source /usr/local/OpenFOAM/OpenFOAM-2.1.0/etc/bashrc
if [ "$1" = clean ]; then
   echo wmake\: cleaning...
   wclean
   exit
else
   if [ "$1" = build ]; then
       echo wmake\: building...
       wmake
       exit
   else
       echo $0\: \*\*\* No rule to $0 target \'$1\'.  Stop.
       exit
   fi
fi
3.2.3 Option 3: Add environment variables manually
well... more work... You can call wmake and wclean from OpenFOAM's bin directory.
You may now be able to build (ctrl+b) and clean the project.
3.2.4 Option 4: Start QtCreator from terminal
If QtCreator is started from a terminal with the OpenFOAM environment loaded, wmake and running the project will work. Running the application and debugging will also work. In a terminal run
. ~/OpenFOAM/OpenFOAM-2.2.x/etc/bashrc
qtcreator
Or if you have OpenFOAM compiled in debug mode,
. ~/OpenFOAM/OpenFOAM-2.2.x/etc/bashrc WM_COMPILE_OPTION=Debug
qtcreator
3.3 Autocomplete
Autocomplete will only work if Qt Creator sees the header files (.H) with the prototypes of the classes, functions, typedef and namespaces you are using. Add the directories where these header files are to your project in the file <project name>.includes. Each line corresponds to one directory.

Notice that Qt Creator will only be able to autocomplete in files which call the respective definition. OpenFOAM coding style often include standard routines inside the algorithm by #include calls. The compiler accepts this, but it is not a good programming practice. In this case, if you try to edit the routine file createFields.H, you will not have autocompletation of things defined in fvCFD.H. Autocompletation will work only in the file where #include "fvCFD.H" is written.
Auto-complete can either be set automatic or by pressing
ctrl+space
3.4 Running application
Here we have the same problem of not having the OpenFOAM environment variables loaded to Qt Creator. The same solutions apply (foamExec, makeScript, etc.). Set a test case directory in the terminal and do not forget to prepare it by generating the mesh (blockMesh...) and configuring the dictionaries.
Note: there was problem when I tried to Run in terminal. There was a bug preventing my Qt Creator to connect with gnome-terminal [1]. My version of Qt Creator runs only with xterm -e, which is not the nicest terminal interface. But works well. You can change the terminal application in: Tools Options... Environment General. In System:Terminal write:
xterm -e
3.5 Debugging
It is also possible to debug applications with the GNU Debugger gdb. You will need to compile your OpenFOAM version in the debug mode. Change the compiler settings in OpenFOAM/OpenFOAM-1.6.x/etc/bashrc to debug with WM_COMPILE_OPTION=Debug and recompile OpenFOAM using ./Allwmake. This will take a few minutes.
There are three different ways of debugging locally with QtCreator, 1) loading a core file from a crashed run, 2) Start a program and attach a debugger 3) attach to a running process. They are all accessed through the menu Debug -> Start Debugging ->
1) You'll need to enable core file dumping. Run
ulimit -c unlimited
Then run your application and wait for it to crash. There should be a new file called core in the directory. Go to QtCreator->menu bar->debug->start debugging ->Attach to core. Select the core file, the application and you should be able to move upp en down in the stack.
Both options 2) and 3) requires that other processes are allowed the read the memory of the debugged app. In order allow this you'll need to run
sudo su
echo 0 > /proc/sys/kernel/yama/ptrace_scope
exit
This will last for the current session only. On reboot you will have to repeat the commands. Note that this reduces the security of your system so don't leave it on for long.
2) This only works if you use option 4 in section 3.2.4 i.e. start qtcreator in a terminal with OpenFOAM environment. Go to Debug->Start Debugging->Start and debug external application. Select your executable and set the run dir to your test case. Tick run in terminal and remember to change the terminal emulator as per section 3.4. Hit Ok and the application should start and you should be able to stop at break points.
3) This option might be less convenient, since it requires your application to be running before you attach to it. One advice is to create an infinite loop or wait for user input somewhere in the code. Start your application outside QtCreator and note the process id. Go to QtCreator and got to Debug -> Start Debugging ->Attached to a running application, set the process id and you should be able to start the debugging process.
One way to wait for user input is to include iostream
#include <iostream>
and then where you want to wait for user input add for example:
std::string go;
std::getline(std::cin,go);
3.6 Usage hints
3.6.1 Jump to class and function declarations
You can open the header-file (.H) where a class or function was declared by using the tool:
Follow symbol under cursor (F2)
This is quicker than checking the doxygen manual! ;-D Obs.: take care not to accidentally alter it if you have writing permission to write to the source files.
3.6.2 Jump forth and back from class.C to class.H
Use the tool:
Switch header/source (F4)
4 Automated set up
The bash script at the end of this section will create the needed QtCreator files and set up build and clean steps to use foamExec wmake. If there is no Make/file and no myApp.C file it will use foamNewSource App to create a new template App. It's been tested to work with QtCreator 2.4.1 and OpenFOAM-2.1.x and OpenFOAM-2.2.x. To create your own copy of icoFoam follow these steps,
cp -r $FOAM_APP/solvers/incompressible/icoFoam myico
cd myico
rm -rf Make/linux* *.dep
mv icoFoam.C myico.C

foamAppToCreator myico
Edit the file Make/file and change the source and target to make sure the original icoFoam doesn't get overwritten. The contents should be
myico.C

EXE = $(FOAM_USER_APPBIN)/icoFoam
Then start QtCreator and open myico.creator. The script assumes that Option 1 from section 3.2 will be used, i.e. compile using foamExec. If you'll be using one of the other options then adjust the build settings accordingly in QtCreator.
File:HowToUseQtCreator FoamAppToQtcreator.tar
Valid versions: ![]()
![]()
5 References
This tutorial is based on:
- using the Qt Creator IDE with non Qt projects posted in the blog Shinnok's Rants.
- Qt Reference Documentation: Specifying Build Settings
- HowTo Use OpenFOAM with Eclipse.
- ↑ [https://bugreports.qt-project.org/browse/QTCREATORBUG-1633 Bug report: Running in terminal works only with XTerm