1 Introduction
This page is dedicated to explaining how to install Helyx-OS in Ubuntu.
If you do not yet feel comfortable using Linux, then perhaps you better first read the page Working with the Shell and train a bit with the shell/terminal environments, so you can have a better perception of the steps shown below.
Contents
2 Copy-Paste steps
A few notes before you start copy-pasting:
- Lines that start with # don't have to be copy-pasted. They are just comments to let you know what's going on.
- One wrong character is enough for breaking this guide, so make sure you can read the characters properly or that the installed language system does not break the copied characters!
2.1 Helyx-OS v2.3.1
Valid versions: ![]()
In this section are the instructions meant for Helyx-OS v2.3.1.
Note: If you have the 64 bit architecture of Ubuntu, perhaps it's best to follow the official installation instructions: Installation of the Latest 64 Bit Linux Binaries @ Github
2.1.1 Ubuntu 16.04
2.1.1.1 Ubuntu 16.04 32bit
Discussion thread where you can ask questions about these steps: Installing HelyxOS on 32 and 64bit Linux Distributions
Steps:
- Install VTK 6.2 + OpenJDK:
sudo apt-get install vtk6 libvtk6-java openjdk-7-jre openjdk-7-jdk
- Download the binary tarball for Helyx-OS from the release tag v2.3.1. You can also download the file through the command line, by running:
wget "https://github.com/ENGYS/HELYX-OS/releases/download/v2.3.1/HELYX-OS-2.3.1-linux-x86_64.tar.bz2" \
-O "HELYX-OS-2.3.1-linux-x86_64.tar.bz2"
- Manually unpack from the file the tarball we need, by running:
tar -xjf HELYX-OS-2.3.1-linux-x86_64.tar.bz2
- Go into the folder Engys/HELYX-OS and remove the jre folder:
cd Engys/HELYX-OS rm -rf jre - Create a symbolic link of the OpenJDK installation that Ubuntu has got:
ln -s /usr/lib/jvm/java-7-openjdk-i386/jre jre - Go into the subfolder v2.3.1:
cd v2.3.1
- Eliminate unneeded contents from the ext subfolder and get a local copy of the necessary VTK libraries:
rm -rf ext/lib*
cp -a /usr/lib/i386-linux-gnu/libvtk* ext/
cp -a /usr/lib/jni/libvtk* ext/
- Remove the lib/vtk6.jar, get the one from Ubuntu, do a few tweaks and package it nicely:
rm lib/vtk6.jar
mkdir lib/vtk6
cd lib/vtk6
unzip /usr/share/java/vtk6.jar
sed -i \
  -e 's=.*vtkParallelMPI4PyJava.*==' \
  -e 's=.*vtkRenderingVolumeOpenGLNewJava.*==' \
  -e 's=.*vtkRenderingExternalJava.*==' \
  -e 's=.*vtkRenderingFreeTypeOpenGL2Java.*==' \
  -e 's=.*vtkRenderingVolumeAMRJava.*==' \
  -e 's=.*vtkRenderingContextOpenGL2Java.*==' \
  -e 's=.*vtkRenderingVolumeOpenGL2Java.*==' \
  -e 's=.*vtkRenderingOpenGL2Java.*==' \
  -e 's=.*vtkDomainsChemistryOpenGL2Java.*==' \
  -e 's=.*vtkIOADIOSJava.*==' \
  -e 's=.*vtkFiltersPythonJava.*==' \
  -e 's=.*vtkFiltersStatisticsGnuRJava.*==' \
  -e 's=.*vtkAcceleratorsPistonJava.*==' \
  -e 's=.*vtkAcceleratorsDaxJava.*==' \
  -e 's=.*vtkInfovisParallelJava.*==' \
  vtk/vtkNativeLibrary.java
javac vtk/vtkNativeLibrary.java
zip -r ../vtk6.jar *
cd ../..
- That is it! You are ready to go:
./HELYX-OS.sh
...Well... when it starts for the first time, it will complain about the missing paths to the core (i.e. OpenFOAM) and ParaView folders, as shown in the image below:
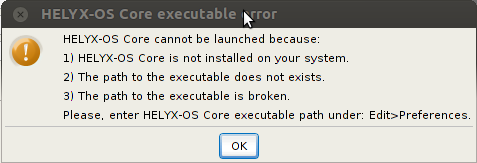 Error message example.
 - Therefore, start a new separate terminal window, activate the OpenFOAM shell environment (if not done automatically) and run these commands:
echo $WM_PROJECT_DIR
echo $ParaView_DIR
They give you the two paths necessary for Helyx-OS.
- Now in Helyx-OS, go to the menu Edit -> Preferences. It should show you something like the image below:
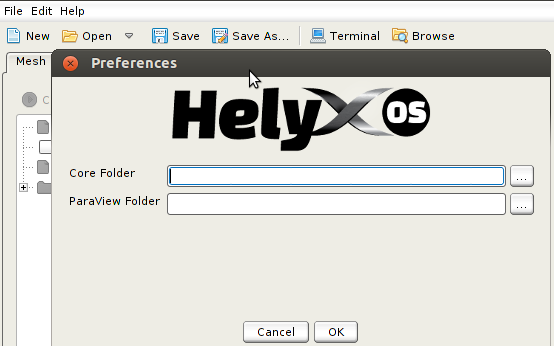 Example of an empty Preferences window. Notice the menu on the upper left corner of the image.
(Don't mind the image being from the older-no-longer-available Helyx-OS 2.0.0) - Place in each edit box, the path given on the terminal window. An example is given below:
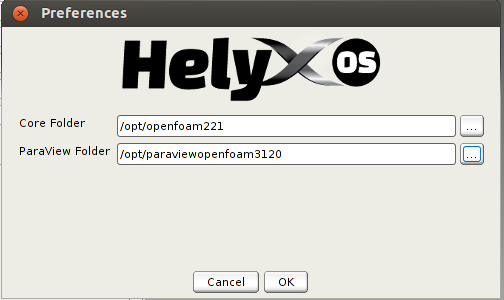 Example with the defined paths in the Preferences window.
(Don't mind the image being from the older-no-longer-available Helyx-OS 2.0.0) - Press on the OK button. And now you're ready to go!


Discussion thread where you can ask questions about these steps: Installing HelyxOS on 32 and 64bit Linux Distributions
2.1.1.2 Ubuntu 16.04 64bit
Discussion thread where you can ask questions about these steps: Installing HelyxOS on 32 and 64bit Linux Distributions
Steps:
- Install VTK 6.2 + OpenJDK:
sudo apt-get install vtk6 libvtk6-java openjdk-7-jre openjdk-7-jdk
- Download the binary tarball for Helyx-OS from the release tag v2.3.1. You can also download the file through the command line, by running:
wget "https://github.com/ENGYS/HELYX-OS/releases/download/v2.3.1/HELYX-OS-2.3.1-linux-x86_64.tar.bz2" \
-O "HELYX-OS-2.3.1-linux-x86_64.tar.bz2"
- Manually unpack from the file the tarball we need, by running:
tar -xjf HELYX-OS-2.3.1-linux-x86_64.tar.bz2
- Go into the folder Engys/HELYX-OS and remove the jre folder:
cd Engys/HELYX-OS rm -rf jre - Create a symbolic link of the OpenJDK installation that Ubuntu has got:
ln -s /usr/lib/jvm/java-7-openjdk-amd64/jre jre - Go into the subfolder v2.3.1:
cd v2.3.1
- Eliminate unneeded contents from the ext subfolder and get a local copy of the necessary VTK libraries:
rm -rf ext/lib* cp -a /usr/lib/x86_64-linux-gnu/libvtk* ext/ cp -a /usr/lib/jni/libvtk* ext/ - Remove the lib/vtk6.jar, get the one from Ubuntu, do a few tweaks and package it nicely:
rm lib/vtk6.jar
mkdir lib/vtk6
cd lib/vtk6
unzip /usr/share/java/vtk6.jar
sed -i \
  -e 's=.*vtkParallelMPI4PyJava.*==' \
  -e 's=.*vtkRenderingVolumeOpenGLNewJava.*==' \
  -e 's=.*vtkRenderingExternalJava.*==' \
  -e 's=.*vtkRenderingFreeTypeOpenGL2Java.*==' \
  -e 's=.*vtkRenderingVolumeAMRJava.*==' \
  -e 's=.*vtkRenderingContextOpenGL2Java.*==' \
  -e 's=.*vtkRenderingVolumeOpenGL2Java.*==' \
  -e 's=.*vtkRenderingOpenGL2Java.*==' \
  -e 's=.*vtkDomainsChemistryOpenGL2Java.*==' \
  -e 's=.*vtkIOADIOSJava.*==' \
  -e 's=.*vtkFiltersPythonJava.*==' \
  -e 's=.*vtkFiltersStatisticsGnuRJava.*==' \
  -e 's=.*vtkAcceleratorsPistonJava.*==' \
  -e 's=.*vtkAcceleratorsDaxJava.*==' \
  -e 's=.*vtkInfovisParallelJava.*==' \
  vtk/vtkNativeLibrary.java
javac vtk/vtkNativeLibrary.java
zip -r ../vtk6.jar *
cd ../..
- That is it! You are ready to go:
./HELYX-OS.sh
...Well... when it starts for the first time, it will complain about the missing paths to the core (i.e. OpenFOAM) and ParaView folders, as shown in the image below:
Error message example. - Therefore, start a new separate terminal window, activate the OpenFOAM shell environment (if not done automatically) and run these commands:
echo $WM_PROJECT_DIR
echo $ParaView_DIR
They give you the two paths necessary for Helyx-OS.
- Now in Helyx-OS, go to the menu Edit -> Preferences. It should show you something like the image below:
Example of an empty Preferences window. Notice the menu on the upper left corner of the image.
(Don't mind the image being from the older-no-longer-available Helyx-OS 2.0.0) - Place in each edit box, the path given on the terminal window. An example is given below:
Example with the defined paths in the Preferences window.
(Don't mind the image being from the older-no-longer-available Helyx-OS 2.0.0) - Press on the OK button. And now you're ready to go!
Discussion thread where you can ask questions about these steps: Installing HelyxOS on 32 and 64bit Linux Distributions