HowTo Use OpenFOAM with Eclipse
Using Eclipse CDT for developing OpenFOAM
Please note: This offering is not approved or endorsed by OpenCFD® Limited, the producer of OpenFOAM® software and owner of the OpenFOAM® and OpenCFD® trademarks.
Contents
1 Thanks to ..
Patrik Eder for his help with setting up Eclipse and Holger Marschall for proofreading.
2 Versions
Operating system: openSuse 10.2
OpenFOAM version: OpenFOAM-1.6.x
Eclipse version: eclipse 3.5.1 (eclipse Galileo)
3 Eclipse Capabilities
"Eclipse is an open source community whose projects are focused on building an extensible development platform, runtimes and application frameworks for building, deploying and managing software across the entire software lifecycle. Many people know us, and hopefully love us, as a Java IDE but Eclipse is much more than a Java IDE." - www.eclipse.org
Eclipse is a powerful integrated development environment IDE originally developed for Java programming. But with the CDT extension Eclipse becomes a very common IDE for C++ programming.
If you want to work on a project in OpenFOAM, it is even not necessary to import the whole OpenFOAM-folder. Only import the project you are working on and the rest of the code will be linked for developing and debugging.
4 Aim of the tutorial
In this tutorial we will import a standard OpenFOAM solver and set up Eclipse for OpenFOAM. After a short introduction in Eclipse's developing features for applications and libraries, debugging in the Eclipse environment using the GNU Debugger GDB will be presented. Everything will be carried out with simpleFoam on the test case pitzDaily while having a look at the turbulence models as libraries.
5 Download and set up Eclipse
To start developing OpenFOAM with Eclipse just download the current version for C/C++ from www.eclipse.org/downloads/. This version already contains the C++ extension CDT (C/C++ Development Tools). Unpack the downloaded file and start Eclipse by clicking on the executable or start Eclipse from the terminal after setting the path variable.
For more information on CDT and CDT installation refer to Further information.
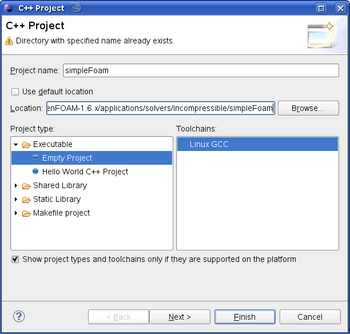
While launching create your own workspace or use the default workspace (for further information refer to Limit number of sources). Change developing environment to C++ in the menu bar under Window -> Show View -> C/C++ Projects. Create a new C++ project in the menu bar under Files -> New -> C++ Project. A C++ project can be a test case, an application or a library of OpenFOAM. Deactivate Use default location, then select the folder you want to import. Set a name for your project. Click Finish.
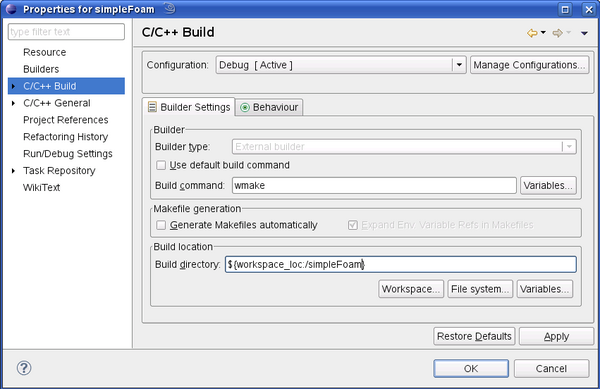
Now, set the OpenFOAM compiler properties for Eclipse. Right-click on your new project in the project explorer on the left side, select properties. Set the compiler command under C/C++-Build. Deactivate the default build command and type in OpenFOAM's wmake. Deactivate Generate Makefiles automatically. Set the build directory – maybe you have to remove the /Release or /Debug. Click OK. Make sure, that Project -> Automatically build in the menu bar is deactivated.
6 Developing and compiling
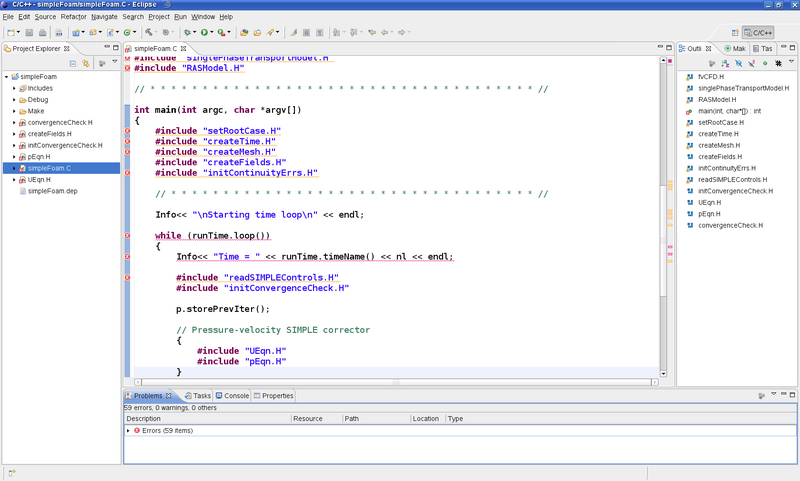
Open your project folder in the project explorer and double-click a file, so the editor will open the file in the middle of your screen. You can now edit your file comfortably with the Eclipse text editor. Code highlighting for C++ is default setting.
The Eclipse editor offers some advantageous tool as the indexer that searches your workspace or project for variables and objects. Another tool is the automatic completion for functions. Call a class and set a „dot“ for a function after it, and you will be offered a list of available functions including parameters. This allows fast programming and avoids searching and jumping between windows. Errors and warnings are marked on the left side of the editor window. Additionally you can set bookmarks or tasks. But please keep in mind that the indexer works only for the imported parts of OpenFOAM.
On the right hand side you can select the outline tab, which presents you the outline of current functions, namespaces and files. (Hint: If the outline tab is missing select: Window -> Show View -> outline – this is valid for all views)
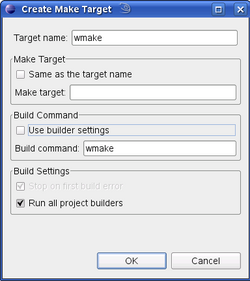
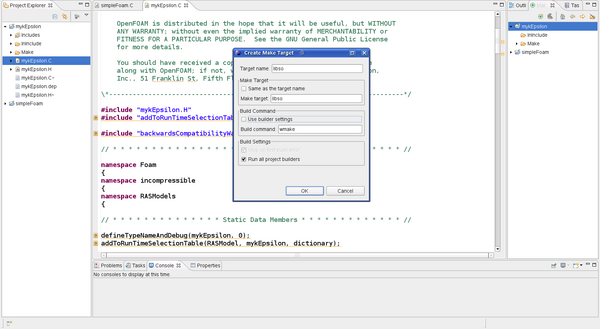
If you want to compile a certain part of your imported project, you must create a make target for Eclipse. Therefore select the make targets tab on the right side of the window. Select the folder where your Make folder is in, and create a new make target with the new make target button.
For compiling an application create a make target named wmake and leave the make target box plain. Build command is the default wmake -- corresponding to the console command wmake.
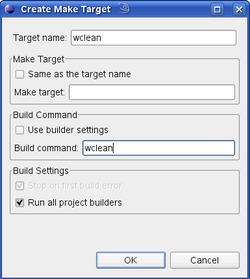
If you want to execute wclean, create a make target named wclean and leave the make target box plain again. Change the build command to wclean.
Execute your make target by double-clicking on it and watch the output in the console window.
Now, create your own turbulence model as described in the OpenFOAM Wiki tutorial “How to use your own turbulence model” of the Special Interest Group (SIG) Turbomachinery. Import the library as C++ project as mentioned above. For compiling the new turbulence model using wmake libso in OpenFOAM, name your make target libso – the build command stays wmake. In analogous way create a wclean libso make target.
