Difference between revisions of "Installation/Live Images/USB-Stick for OFW11/User Guide"
(→Details of the desktop: Done!) |
m (→Starting up OpenFOAM/foam-extend: fix visibility) |
||
| Line 100: | Line 100: | ||
= Starting up OpenFOAM/foam-extend = | = Starting up OpenFOAM/foam-extend = | ||
Double click on the {{tt|LXTerminal}} icon. | Double click on the {{tt|LXTerminal}} icon. | ||
| − | * For loading the shell environment for OpenFOAM 3.0.x, run: <bash>of30x</bash> | + | * For loading the shell environment for OpenFOAM 3.0.x, run: <bash> of30x</bash> |
| − | * For loading the shell environment for foam-extend 3.2-nextRelease, run: <bash>fe32</bash> | + | * For loading the shell environment for foam-extend 3.2-nextRelease, run: <bash> fe32</bash> |
'''Note''': Always use a different {{tt|LXTerminal}} for each version. | '''Note''': Always use a different {{tt|LXTerminal}} for each version. | ||
<br> | <br> | ||
Revision as of 19:48, 13 February 2016
WARNING: These instructions are currently being written and under testing!
1 Introduction
This small user guide aims at getting you started with using the 64-bit Lubuntu 15.10 Live installation that is currently available for a physical USB-stick (real or virtual boot) or as a Virtual Machine Appliance for the VirtualBox.
WARNING: The image and virtual machines created for the Workshop will not work in 32-bit machines.
Contents
2 Software provided with the disk image(s)
- Lubuntu 15.10 x86_64
- Live USB drive boot for full capabilities.
- Virtual Box installers for Mac OS X and Windows, along with the respective virtual machine for virtual live booting are provided in the USB drive as well, in case the live boot in the real machine fails.
- foam-extend 3.2-nextRelease branch
- OpenFOAM 3.0.x
- Note: It's not OpenFOAM-dev, because we already have foam-extend 3.2-nextRelease branch to worry about.
- Each version of foam-extend and OpenFOAM will have its own version stack of third-party software. For example:
- OpenFOAM 3.0.x will provide ParaView 4.4;
- foam-extend 3.2-nextRelease will probably provide ParaView 5.0.
- swak4Foam and PyFoam, both as up-to-date as possible, for both foam-extend and OpenFOAM.
- cfMesh, as up-to-date as possible, for both foam-extend and OpenFOAM.
- (Planned, not yet available) Helyx-OS
- (Planned, not yet available) DICE
- (Planned, not yet available) Cases and software for the training sessions
3 Booting
There are 3 ways we can boot up the Lubuntu Live installation that was created for this Workshop:
- If you believe your laptop (or transportable desktop) computer can boot the physical USB-stick, then please try the instructions given in section Installation/Live_Images/USB-Stick_for_OFW11/User_Guide#Booting directly from the USB-stick.
- If your laptop (or transportable desktop) computer cannot boot from the physical USB-stick, then please try the instructions given in section Booting the USB-stick via VirtualBox.
- If your machine cannot handle the USB stick, or if you cannot deploy the disk image to your own USB-stick or if there aren't any more sticks left in the Workshop, then you can rely on using a Virtual Machine. For this, follow the steps given in section Booting without USB-stick and with Virtual Machine Appliance.
3.1 Booting directly from the USB-stick
Each laptop has its own booting strategy, where some might not even be able to do so.
Nonetheless, the conventional way is:
- Insert the USB-stick in your laptop.
- While the laptop is booting up, it should show a keyboard key option for booting, which usually is either one of the following keys: DEL, F2, F10, ESC, Or any other F* keys.
- Then either use the boot menu that the BIOS/UEFI provides or configure the BIOS/UEFI to first boot from the USB-stick.
- If it starts booting properly from the USB-stick, it should show the language selection screen, as shown in the chapter Live Boot menu .
- Or possibly only a black screen with only a symbol on the lower left corner of the screen. In which case, please wait 30 seconds to start booting without pressing any keys.
Now, depending on whether it all went well or not:
- If it went well, then please proceed to the chapter Live Boot menu .
- If it did not go as planned, then please turn off your computer and boot into your standard Operating System, may it be Windows or Mac OS X. Then go to the section Booting the USB-stick via VirtualBox.
3.2 Booting the USB-stick via VirtualBox
TODO
3.3 Booting without USB-stick and with Virtual Machine Appliance
TODO
If all went well in the chapter Booting, then please follow the following steps:
- The first screen after the booting process started, should be the language option:

 The welcoming boot screen, where it asks for the language you want to use.
Use the cursor keys to navigate and then use the Enter/Return key. - It should then show the boot menu:

- This is the keyboard options menu:
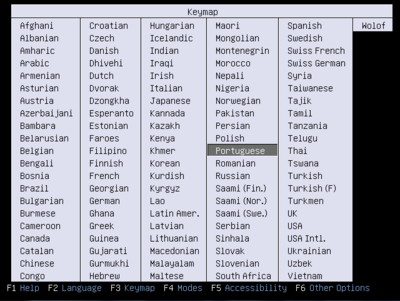 Use the cursor keys to choose the keyboard configuration for your computer. Then press the Enter/ or the Return key.
 - Now we’re back to the boot menu:
Make sure the first entry Try Lubuntu without installing is white. Press the Enter or the Return key.
- If all went well, the light on the USB-stick should start blinking (if there is one) and the boot menu will take a little while to go away… eventually, something like one of the following two images will appear:
 This is the pretty boot screen...
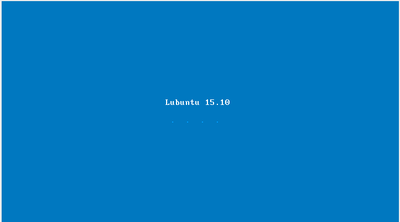 This is the textual screen, so it will either show this, or as a last resort it will show a black screen.
Either way, please wait 20 seconds to 3 minutes for it to boot. - When the boot is complete, it should show the Lubuntu Desktop:
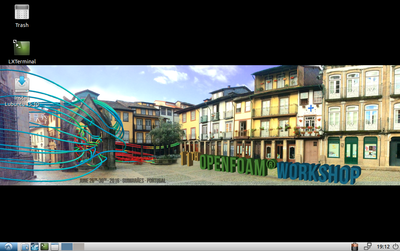 Do you see it? If not, ask for assistance at the Workshop or on the forum at CFD-Online.


Now, if all went well, please continue reading the next chapters!
5 Details of the desktop

- Start menu... well, it's called something else, but it's akin to Windows XP Start button.
- File explorer, for looking interactively to the contents of the files.
- Firefox, for browsing the internet or at least for opening HTML pages.
- LXTerminal, which is the console application for interacting with OpenFOAM/foam-extend applications.
- Minimize all windows, so that we can see the desktop.
- Workspaces, which represent 2 desktops, for showing only one at a time. It's a neat desktop organization capability.
- Window list bar, where the open windows on the current workspaces at listed as long buttons
- Battery icon, which should look different when you have a laptop and the battery is plugged in.
- Network (and WiFi) configuration.
- Shows the current time... and date if you click on it.
- The button for system shutdown, reboot and so on.
6 Starting up OpenFOAM/foam-extend
Double click on the LXTerminal icon.
- For loading the shell environment for OpenFOAM 3.0.x, run:
of30x
- For loading the shell environment for foam-extend 3.2-nextRelease, run:
fe32
Note: Always use a different LXTerminal for each version.